Home → Software → Printer Friendly Version
Software
- 1. Assessment Applications
- 2. Apple Creativity
- 3. Adobe Creative Cloud
- 4. NWEA Map Testing
- 5. Office 365
- 6. SIMS Desktop
- 7. Zoom
- 8. Web Filter
- 9. Professional Learning
- 9.1. Professional Learning - Accessing the Platform
- 9.2. Professional Learning - Home Page Overview
- 9.3. Professional Learning - Courses Tab
- 9.4. Professional Learning - How to Register for Courses
- 9.5. Getting Started with a Self Paced Course
- 9.6. Professional Learning - Calendar
- 9.7. Check Credits Earned
1. Assessment Applications
1.1. 2021-22 Assessment Device Information
Click here to open the full document in order to download and/or print.
2. Apple Creativity
2.1. GarageBand: Downloading Loops
After downloading GarageBand, open it and click “Download later” on the dialog asking to download the essential loops.
Click Continue on the next dialog.
Open an empty project, and under the time display, click the orange bar.
Click the “x” next to the Essentials Sound Pack.
Click Cancel Download or Cancel Install.
Now, quit GarageBand and reopen Self Service.
Download the GarageBand Basic Loop Pack.
After the install is complete, open GarageBand and the basic loops should be available in the loop panel.
If you do not see the loops as available in the panel, Click the All Genres dropdown and then click Reindex Loops.
3. Adobe Creative Cloud
3.1. Obtaining a License
Adobe licensing for any Creative Cloud (CC) product (Acrobat Pro, Photoshop, etc.) is subscription based and can be purchased on a per computer basis. Each machine the software is loaded on consumes a license. Licenses for the CC suite are $24.49 per computer, per year. End user buildings/budgets are responsible for covering the cost of this license. Charges are incurred/billed out to buildings in June of each fiscal year.
The District Technology Department purchases a central license bundle at a discounted/contract rate and then is able to apply individual computer licenses to PLCS devices that have purchased a license.
To obtain a license, please complete a helpdesk request. An account code must be provided to charge the license(s) to. Additionally, the computer asset tag number(s) of the computer(s) you desire to license should be provided. A sample asset tag is shown below.
3.2. Adobe Activation/Sign In
For devices that have any component of the Adobe Suite installed, logging into the service is required for activation. This is part of Adobe's licensing process to prevent software from being utilized past the number of licenses purchased.
For PLCS devices, the login/activation process is as simple as typing in our district website and clicking the "Sign in" button. No password is required. This is part of the Single Sign On implementation.
- In the Email address field, simply type "plcschools.org"
- Click "Sign in" (no password is required)
Your session should be activated. For shared devices (multi-user, typical students), this process must be followed each time a new user logs into the device. For non-shared devices (single-user, typically staff) it should remember your activation settings, but may occasionally display this prompt to check in with Adobe activation servers.
If prompted to sign in with your PLCS account, proceed by utilizing your PLCS username/password (first.last for staff or student ID for students) to login.
4. NWEA Map Testing
4.1. Manually Update NWEA MAP via Software Center (Windows PC)
The NWEA Secure Testing Browser should update on all district devices automatically as updates are available and pushed out by the DTC. If a Windows PC displays an error that the application is out of date, updates can be run manually by following the steps below.
- From the Start menu, search for "Software Center"
- Navigate to "NWEA Secure Testing Browser" application. If an update is available it will display a black "Install" box. If the application is updated the box will be grayed out and say "Uninstall" instead. This indicates there are no additional updates available.
4.2. Launch NWEA Secure Testing on a Chromebook
To launch NWEA MAP Secure Testing on a Chromebook:
- At the login screen, click "Apps" (bottom left-hand corner) **NOTE: the user must be completely logged out of the device to see the "Apps" button as this is how the software locks the student into the testing engine.
- Select "NWEA Secure Testing" to launch the software
*Note: Students do not need to login to launch NWEA Secure Testing on a Chromebook.
4.3. Launch NWEA Secure Testing on a Windows PC
To launch NWEA MAP Secure Testing on a Windows PC (laptop or desktop):
- Instruct the student to login to the device with their PLCS account
- Click Start and scroll down to the "NWEA" folder or type "NWEA" in the search box
- Launch NWEA Secure Testing Browser
4.4. 2021-22 NSCAS Testing
|
Students have two options for launching the state testing software (NSCAS) |
||
|
_____________________________________________________________________ |
||
|
Option 1: Chromebook |
||
| Go to the login screen of a Chromebook and click on Apps. From the list, click on the NWEA State Solutions Secure Browser (blue icon). See image below. | ||
|
_____________________________________________________________________ |
||
|
Option 2: iPad |
||
| Go to the home screen of an iPad and swipe to find the NWEA State Solutions Secure Browser (blue icon). See image below. | ||
|
NOTE: The NWEA Growth app is NOT the same as the NWEA State Test App |
||
5. Office 365
5.1. OneDrive/OneNote iOS Reset
On your iOS device (iPhone or iPad), go to your Settings app.
On the main Settings page, scroll down toward the bottom, through your list of apps, to find OneDrive (or OneNote). Tap on OneDrive (or OneNote).
Tap to toggle “Clear Account Settings” on. Once you tap that toggle, it will turn green.
Open your OneDrive (or OneNote) app. You will be prompted to sign in. On this screen, tap on “Email or phone” and enter your district email address (firstname.lastname@plcschools.org).
You will then be taken to the district sign-on page, where you will enter your username (firstname.lastname) and your district password. Once you have signed in, you should be able to access your OneDrive documents.
6. SIMS Desktop
6.1. Installing SIMS Desktop (PC)
Note: You must have special authorization to use SIMS Desktop. If you are not sure if you have authorization, contact your Supervisor. If you are not authorized to use SIMS Desktop, you will not be able to complete these steps.
These instructions are for users with a district-owned PC.
First, open the Start Menu and search for Software Center. Click Open when it is found.
In the top right of the Software Center window, use the search bar to find SIMS. Click it when found.
Click the Install button to install the software to your computer.
The software has finished installing when the button changes to Uninstall and Status: Installed is shown near the bottom.
You should be able to find SIMS 12.5 in your start menu and be able to launch the application.
7. Zoom
7.1. Zoom Recording File Management
All certified staff members within PLCS have access to a licensed (aka "Pro") Zoom account. One of the features of a licensed Zoom account is access to the cloud recording functionality. This allows for easy meeting recording that converts the file and generates a shareable link for the recorded content.
This is a great feature as it puts the processing power needed for recording in the cloud and not on the user's computer. However, there is a storage limit on our cloud recording 'bucket' of storage and it is shared across all PLCS users. In order to maintain available storage space, the following guidance is recommended for recording management.
- Only keep recordings that are needed. Generally a class period/lesson/day recording would not be needed past making sure students are caught up if absent. Two weeks or less is likely enough time to keep recordings.
- If recordings are needed longer, download them from Zoom and upload to another location for long-term storage. Google Drive has unlimited storage capacity. It is recommended to place all recordings under one main folder and then utilize sub-folders under that (see directions below).
PLEASE NOTE: Starting Monday, February 22, 2021 - Zoom will automatically delete cloud recordings 30 days after the meeting date. For example if you record a meeting on Zoom's cloud recording storage on 3/1 and you wanted to keep the recording you would need to download the video by 3/31. If you need to save a video past the 30 day mark, please follow the directions outlined below to download it and save to Google Drive.
If you are unsure what videos you have stored in the cloud, you can view and manage your cloud recordings here: https://plcschools.zoom.us/recording
To download cloud recordings, click "More" > "Download (# files)". This downloads the video files in various formats/quality. It also downloads just the audio of the files and any chat associated with the meeting (if applicable). From there you can upload to Google Drive using the directions below.
Alternatively, to skip downloading and re-uploading you can utilize the local recording feature which will save the recording on your computer to upload into Google Drive after the meeting finishes. Local recording can cause the host computer to function slower and fill up hard drive space.
7.2. Keeping Zoom Updated
Zoom.us is set to automatically update when your computer is idle. Try leaving your computer open and awake when Zoom updates are pending and you should get a message about Zoom updating. Here is an example of what the message looks like:
You can also check inside Zoom under the user menu to make sure that the application isn't already updated:
4.6.10 is the latest version as of 4/8/2020.
Optionally you can always open Self Service go to Zoom and click Reinstall.
7.3. Getting Started
Sign in and Join
After launching Zoom, click Join a Meeting to join a meeting without signing in. If you want to log in and start or schedule your own meeting, click Sign In.
To sign in choose Sign in with
Google. If you have a Zoom account but cannot remember your
password, click Forgot.
Home
After signing in, you will see the Home tab, where you can click these options:
- New Meeting: Start an instant meeting. Click the downwards arrow to enable video or use your personal meeting ID (PMI) for instant meetings.
- Join: Join a meeting that is in progress.
- Schedule: Set up a future meeting.
- Share Screen: Share your screen in a Zoom Room by entering in the sharing key or meeting ID.
- Date
and time with background image: To change the background image, hover over
the picture and click the camera icon.
- Upcoming
meeting: Displays the next meeting for the current day.
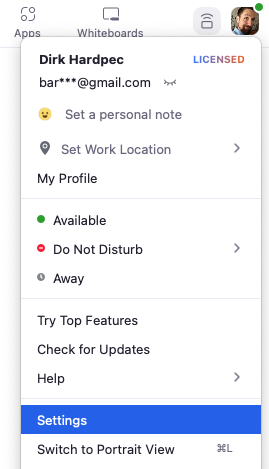
- Click
your profile picture for these options:
- Add a personal note.
- Settings: Access settings you can change in the client.
- Change your status to Available, Away, or Do Not Disturb.
- My Profile: Open the Zoom web portal to edit your profile.
- Help: Open the Zoom Help Center.
- Check for Updates: Check if Zoom is up to date.
- About Zoom: View the current version.
- Switch to Portrait View: Switch the Zoom window to portrait view if you prefer a narrower window.
- Sign out
- Upgrade to Pro (if you are on a free account)
Chat
Select the Chat tab to view private conversations with your contacts or group conversations (channels).
You can access these features in the left-side panel:
- Jump to search box: Search for a contact or channel.
- Starred Messages: View messages you have starred.
- Click your name to use your personal chat space.
- Add
icon
(next to Recent): Start a new chat with one of your contacts, create a channel for group chats, or join an existing channel.
- Under Recent,
click a contact to view chat history and continue to chat with them.
Contacts have a status icon before
their name.
- Under Recent,
click a channel (indicated
by the group icon before the name) to view the channel's chat history and
send messages to channel members.
After
selecting a contact or channel in the left-side panel, you can use these
features in the chat window:
- Star
icon
: Add the contact or channel to your starred list, giving you quick access to those contacts or channels.
- Video
icon
: Start a meeting with the contact. If a channel is selected, this will start a meeting with all members of the channel.
- New
window icon
(hover your pointer over the contact or channel name to display this icon) : Opens the selected chat in a new window.
- Info
icon
: View additional options for the contact or channel. Also gives you quick access to files, images, and starred messages in the selected chat.
- Message box: Compose and send messages to your contact or channel. You can also send screenshots, files, code snippets, and animated GIFs.
Phone
Select the Phone tab to make phone calls, view call history, and play voicemail messages using Zoom Phone.
Note: Zoom Phone license is required.
- History tab: View and delete call history and recordings.
- Voicemail tab: Play and manage voicemail messages.
- Dial pad: Make outbound calls by manually entering a phone number or searching through your contacts.
Learn more about using Zoom Phone features.
Meetings
Select the Meetings tab and click Upcoming to view, start, edit, and delete scheduled meetings.
You can click the following options after selecting a scheduled meeting in the left-side panel:
- Add
icon
: Schedule a new meeting.
- Refresh
icon
: Refresh the meeting list if you don't see your scheduled meeting.
- Start: Start the scheduled meeting that you have selected in your upcoming meetings.
- Copy Invitation: Copy the scheduled meeting's invitation text, allowing you to manually paste into an email, instant messenger etc. Click Show Meeting Invitation if you want to view the invitation you're copying.
- Edit: Edit the meeting options for your scheduled meeting.
- Delete: Permanently delete your scheduled meeting.
Contacts
Select the Contacts tab to view and manage your contacts.
- Directory tab: View a directory of all your contacts, including starred, external, and auto answer contacts. If your organization has Zoom Rooms, you will also see a list of Zoom Rooms.
- Channels tab: View a directory of your channels (used for group messaging). Starred channels appear at the top of the list.
- Add
icon
In-Meeting Controls
Once you have started or joined a meeting, you can access the meeting controls located at the bottom of the meeting window (move your mouse in the Zoom window to display meeting controls).
7.4. Testing Audio/Video
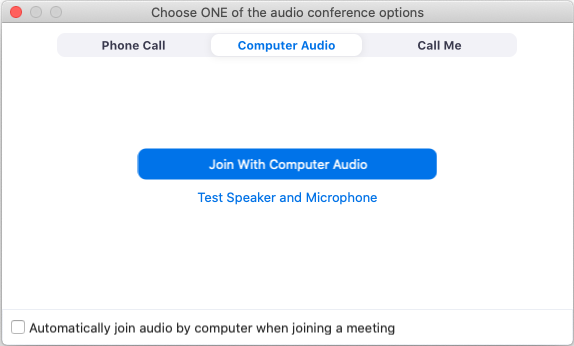
If you haven't enabled the setting to automatically join by computer audio, you can test your speaker and microphone before joining a meeting:
- After joining a meeting, click Test speaker and microphone.
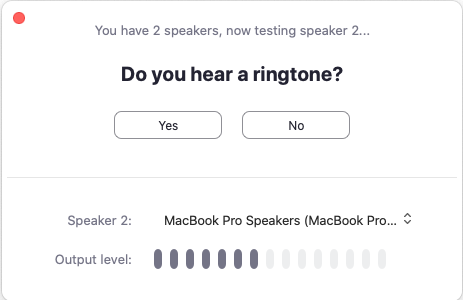
- The meeting will display a pop-up window to test your speakers. If you don't hear the ringtone, use the drop-down menu or click No to switch speakers until you hear the ringtone. Click Yes to continue to the microphone test.
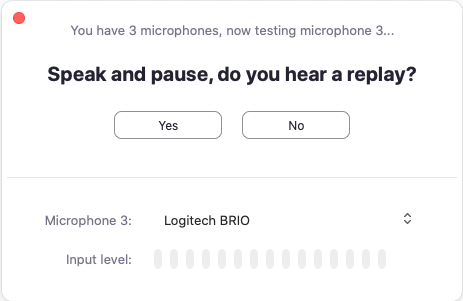
- If you don't hear an audio replay, use the drop-down menu or click No to switch microphones until you hear the reply. Click Yes when you hear the replay.
- Click Join with Computer Audio.
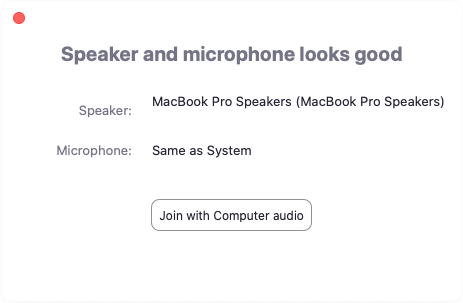
- Click Join with Computer Audio to join the test meeting with the selected microphone and speakers.
Testing Audio Using Audio Settings
To test your audio, navigate to your audio settings before or during a meeting:
Before a meeting
- Log in to the Zoom client.
- Click your profile picture then click Settings.
- Click the Audio tab.

- Follow the sections below to test your speaker or microphone.
During a Meeting
You can access your audio settings and test your audio when you are already in a meeting.
- In the meeting controls, click the arrow next to Mute/Unmute.
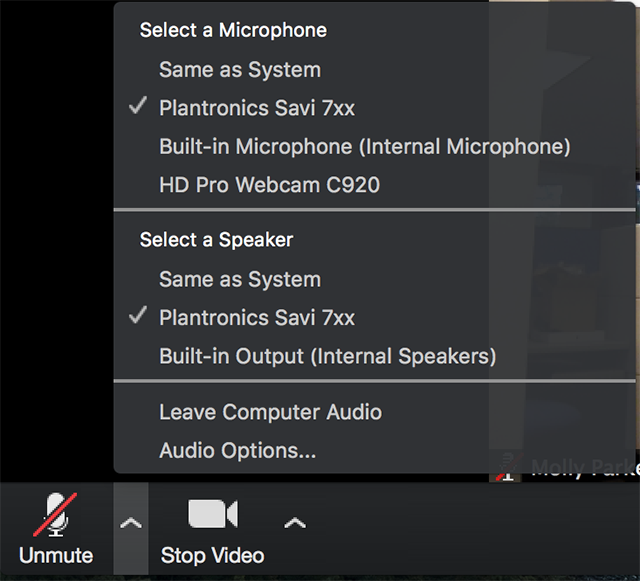
- Click Audio Options. This will open your audio settings.
Testing your Speaker
- Click Test Speaker to play a test tone.
- If you cannot hear it, select a different speaker from the menu or adjust the Volume.

Learn more about audio settings.
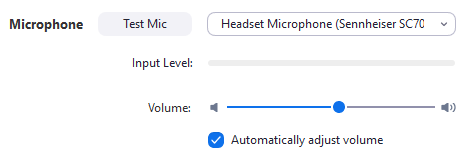
Testing your Microphone
- In the Microphone section, you will see the green Input Level bar move when Zoom is picking up audio.
- Click Test Mic to test your microphone.
- Your audio will start recording. Click Recording when you are done and it will play back. You can select another microphone from the menu or adjust the input level.
- Check Automatically adjust microphone settings if you want Zoom to adjust the input volume automatically.
Learn more about audio settings.
Microphone Troubleshooting
- If you are on on Mac OS 10.14 Mojave or earlier and can't access the microphone, check your operating system permissions to confirm that Zoom has access to the microphone. See Using the Zoom Client and Zoom Rooms with Mac OS 10.14 Mojave for more information.
- If you are on Windows 10 and can't access the microphone, use the Windows search box to navigate to Microphone privacy settings. Switch on the Allow apps to access your microphone toggle, and enable access for Zoom.
7.5. Zoom Audio Plugins
This article only applies to users hosting Zoom meetings on a Mac computer.
If you need to share your computer's sound with other Zoom participants, you will need to install the Zoom Audio Plugins. The Zoom Audio Plugins are not required for video-only screen sharing.
To Install:
Open Self Service.
Find "Zoom Audio Plugins".
Click Install. Note that your computer will restart as part of the installation.
Click Install again if prompted.
Wait for your computer to restart.
Once logged back in, you can start Zoom and will be able to share your computer sound. When starting screen sharing, make sure to check the "Share computer sound" box at the bottom of the dialog if you want to share your sound for this session.
7.6. Accepting Zoom Invite
Please follow the directions outlined below to accept the Zoom invitation. Doing so will ensure your account is under the state-wide Zoom umbrella and have the features associated with our level of accounts (ability to add a co-host, increasing the 100 attendee limit to 300 attendee's, etc).
IMPORTANT NOTICE: This process will NOT ask for your Zoom password. If you are being asked for a Zoom password after clicking "Approving the Request" please contact the helpdesk (helpdesk@paplv.org or 402-537-6299).
- You should receive a Zoom account invitation via email (if you do not see it in your inbox, check your clutter folder). It will state that ESU 3 (wpulte@esu3.org or mhansen@esu3.org) is requesting to add you to their Zoom account. You can click "Approve the Request" to continue.
- Select "I Acknowledge and Switch" on the invitation acceptance screen.
- Zoom will confirm your account is being provisioned.
- Once your invitation has been accepted and the account has been provisioned, you will receive a confirmation emial.
8. Web Filter
8.1. Blocked/Restricted Page
You will see this page when the web filter has blocked your request to visit a website.
On the page, next to the text URL Categories, will be the category or reason for the page being blocked.
If you believe the site that is being blocked is acceptable, please enter a helpdesk ticket with the full URL to the website (copy and paste).
8.2. CKAuthenticator
CKAuthenticator is a background application used by our web filter to identify your device and the web filtering policies that should be assigned to it. It has no user interface and is installed and updated in the background by our device management software. It shows an icon in the menu bar or taskbar tray, or as an application on the home screen in the case of iPads, showing that it is operational.
Tray icon as shown on Windows and macOS:
App icon as shown on iOS:
9. Professional Learning
9.1. Professional Learning - Accessing the Platform
The Professional Learning platform can be accessed via My Apps. Visit My Apps (https://myapps.plcschools.

9.2. Professional Learning - Home Page Overview
Below is an overview of the Professional Learning home page.
Click the image below to zoom or watch the overview video below.
9.3. Professional Learning - Courses Tab
Below is an overview of the Professional Learning courses tab.
Click the image below to zoom or watch the overview video below.
9.4. Professional Learning - How to Register for Courses
Below is an overview of how to register for a course in the Professional Learning platform.
Click the image below to zoom or watch the overview video below.
9.5. Getting Started with a Self Paced Course
View the video to learn how to navigate a Self Paced course
9.6. Professional Learning - Calendar
This video provides an overview of the Professional Learning calendar and Google calendar integration.
9.7. Check Credits Earned
Navigate to Professional Learning via MyApps and click the Transcript tab on the top left menu. Scroll down to see credits earned.